|
Quick Links CauseNo cause information available. ResolutionFor help with video or display issues such as: no video or no display, blank or black screen, flickering, resolution or color issues, horizontal or vertical lines, etc. refer to an expanding section below. Show all | Hide all
The key features of Dell P2419H monitor are: Up to 1920 x 1080 through VGA, DisplayPort, and HDMI, with fullscreen support or lower resolutions Tilt, swivel, height, and rotate adjustment capabilities Digital connectivity with DisplayPort and HDMI 1 USB upstream port and 4 USB downstream ports Color gamut of 72% NTSC 0.3 W standby power when in sleep mode
This section provides some specifications of the Dell P2419H monitor. To learn more about the specifications of Dell P2419H monitor, see the User Guide at the Dell Manuals website. Panel technology In-plane Switching, TFT LCDAspect ratio 16:9 Maximum resolution 1920 x 1080 at 60 Hz Viewing angle 178° (vertical and horizontal) typical Contrast ratio 1000 to 1 (typical) Response time 8 ms (Normal) 5 ms (Fast) Color gamut 72% (CIE1931) NOTE: Color gamut (typical) is based on CIE1976 (82%) and CIE1931 (72%) test standards. Color depth 16.7 million colors Ports and connectors 1 x VGA port 1 x HDMI port version 1.4 1 x DisplayPort version 1.2 1 x USB 3.0 upstream port (bottom) 2 x USB 3.0 downstream ports (side) 2 x USB 2.0 downstream ports (bottom)
Ensuring that your Dell monitor is setup properly - assembling the monitor stand and setting up the monitor ergonomically, connecting the cables and organizing them, will only help make the viewing experience the best it possibly can be. Attaching the standThe standard monitor stand is detached when the monitor is shipped from the factory. To learn more about attaching the standard monitor stand, see the Setting Up the Monitor section in the User Guide of your Dell P2419H monitor. Where you put your monitor is almost as important as what model you buy. The monitor should be directly in front of you, at an arm’s length away (between 20-40 inches from your eyes), with the top edge of the screen at eye level when you’re sitting comfortably. You may need to adjust your chair height or the height of the monitor to achieve this. Connecting your monitor to the PCTo connect your Dell P2419H monitor to your PC: Turn off your PC and disconnect the power cable. Connect the DisplayPort, Mini-DP or DP (DisplayPort), HDMI or VGA cable to the corresponding video or display port on the back of your PC. Connect the USB upstream cable to the monitor and PC (if applicable). To learn more about connecting your monitor to the PC, see the Dell knowledge-base article How do I connect a monitor to a PC?.
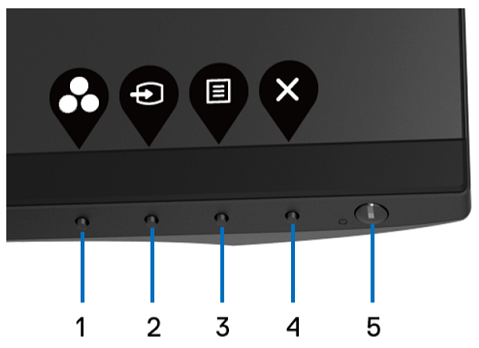
Use the buttons at the bottom of the monitor to access the On-Screen Display (OSD) menu of the monitor. To access the On-Screen Display (OSD) menu, press Button 3 (Figure 1) at the bottom of the monitor. To learn more about how to use the On-Screen Display (OSD) menu, see the Operating Your Monitor section in the User Guide of Dell P2419H monitor. NOTE: Any changes you make are automatically saved when you move to another menu item, exit the OSD menu, or wait for the OSD menu to automatically close.
Figure 1: Dell P2419H Front Panel Buttons Button Function Description Button 1 Shortcut key/Preset Modes Use this button to choose from a list of preset modes Button 2 Shortcut key/Input source Use the buttons to adjust the volume or change the Input source Button 3 Menu Use the Menu button to launch the On-Screen Display (OSD) menu Button 4 Exit Use this button to go back to the previous menu or exit the OSD menu Button 5 Power On/Off button (with LED indicator) Solid white light indicates the monitor is On and fully functional. Blinking white light indicates the power save mode
Resetting a monitor to factory defaults can help resolve many video or display issues. To reset your Dell P2419H monitor to factory default settings, follow these instructions: Press Button 3 (Figure 2)on the monitor to enter the On-Screen Display (OSD) Menu. Press Button 1 or Button 2 to highlight Others option in the menu and press Button 3 to select. Press Button 1 or Button 2 to highlight Factory Reset option in the menu and press Button 3 to select. Press Button 3 to confirm the reset action.
Figure 2: Dell P2419H Front Panel Buttons
If your Dell monitor has a blank or black screen, fuzzy or blurry image, flickering, distorted or any other screen abnormalities, running a diagnostic test will help determine if the Dell monitor is functioning normally. To learn more about diagnostic options on a Dell monitor, see the Dell knowledge-base article How do I run diagnostics on a Dell monitor? It is always essential to isolate the monitor while troubleshooting your computer for the following scenarios: No Power - Your computer is not powering ON or showing any signs of power. No POST - Your computer is not showing any indication of activity, the screen might be blank and will not display the Dell logo during start-up. No Video - You are unable to see any display on the screen, able to hear the windows chime but no display is seen.
Your Dell P2419H Monitor provides a self-test feature check that allows you to check whether the monitor is functioning properly. If the monitor and computer are properly connected but the monitor screen remains dark, run the monitor self-test by performing the following steps: Turn off both your computer and the monitor. Unplug the video cable from the back of the computer. To ensure proper Self-Test operation, remove the video cables (VGA, DVI, HDMI or DisplayPort) from the back of the computer. Turn on the monitor. Turn off your monitor and reconnect the video cable: then turn on both your computer and the monitor. If your monitor screen remains blank after you use the previous procedure, check your video card (GPU) and computer, because your monitor is functioning properly.
Your Dell P2419H monitor has a built-in diagnostic tool that helps to determine if the screen abnormality you are experiencing is a problem with the monitor or with the video card on your computer. When you notice screen abnormalities like distortion, clarity, horizontal or vertical lines, color fade etc., it is always a good practise to isolate the monitor by running the Built-In Diagnostics. Make sure that the screen is clean (no dust particles on the surface of the screen). Unplug the video cable(s) from the back of the computer or the monitor. The monitor will now enter self-test mode. On the front panel, press and hold Button 1 for 5 seconds. A gray screen appears. Carefully inspect the screen for abnormalities. Press Button 1 on the front panel again. The color of the screen changes to red. Inspect the display for any abnormalities. Repeat step 5 and step 6 to inspect the display in green, blue, black, white and text screens. The test is complete when the white screen appears. Press Button 1 to exit the Built-In Self Test diagnostics.
NOTE: If you do not detect any screen abnormalities upon using the built-in diagnostic tool, the monitor is functioning properly. Check the video card (GPU) and the computer.
During the LCD Monitor manufacturing process, it is not uncommon for one or more pixels to become fixed in an unchanging state which are hard to see and do not affect the display quality or usability. For more information, see the Dell knowledge-base article Dell LCD Monitor Pixel Guidelines.
This section provides information on troubleshooting steps that can help resolve the most common issues with the Dell P2419H monitor. Alternatively, to learn more about troubleshooting common issues on Dell monitors, see the Dell knowledge-base article How to Troubleshoot Display or Video Issues on a Dell Monitor. Common Problem What User Experiences Possible SolutionNo Video - Power LED Off No picture Make sure that the power cable connecting the monitor is properly connected and secure. Verify that the power outlet is functioning properly using any other electrical equipment. Make sure that the power button is depressed fully. Test with known good cable and known good system if possible. No Video - Power LED On No picture or no brightness. Increase the brightness and contrast of the monitor through . Perform monitor self-test feature check. Check for bent or broken pins in the video cable connector. Reseat both ends of video cable. Try with known good video cable. Run the . Make sure that the correct input source is selected via the Input Source Select button. Test monitor with known good system if available. Poor Focus Picture is fuzzy, blurry or ghosting. Reseat both ends of video cable. Try with known good video cable. Perform Auto Adjust via . Adjust the Phase and Pixel Clock controls via . Eliminate video extension cables. Reset the monitor to . Shaky/Jittery Video Wavy picture or fine movement. Perform Auto Adjust via . Adjust the Phase and Pixel Clock controls via . Reset the monitor to . Check for environmental factors (like fans or other sources of interference). Relocate the monitor and test it in another room. Missing Pixels LCD screen has spots. Cycle power on-off. Pixel that is permanently off is a natural defect that can occur in LCD technology. Run the . Stuck-On/Off Pixels LCD screen has bright spot. Brightness Problems Picture too dim or too bright. Dim/discolored video can be caused by the video cable, so try reseating the cable and swapping with a known good part. Reset the monitor to the . Perform Auto Adjust via . Adjust the Brightness/Contrast controls via the . Geometric Distortion Screen not centered correctly. Reset the monitor to . Perform Auto Adjust via . Adjust the Brightness/Contrast controls through the . When using DisplayPort input, the positioning adjustments are not available. Horizontal/Vertical Lines Screen has one or more lines. Reset the monitor to the . Perform Auto Adjust via . Adjust Phase and Pixel Clock controls via . Perform monitor self-test feature check and determine if these lines are also in self-test mode. Check for bent or broken pins in the video cable connector. Run the . When using DisplayPort input, the positioning adjustments are not available. Synchronization Problems Screen is scrambled or appears torn. Reset the monitor to the . Perform Auto Adjust via . Adjust Phase and Pixel Clock controls via . Perform monitor self-test feature check to determine if the scrambled screen appears in self-test mode. Check for bent or broken pins in the video cable connector. Restart the computer in the power safe mode. Safety-Related Issues Visible signs of smoke or sparks. Do not perform any troubleshooting steps. Contact Dell Technical Support immediately. Intermittent Problems Monitor malfunctions on and off. Make sure that the video cable is connected properly with the monitor and the computer. Reset the monitor to the . Run the self-test feature and determine if the intermittent problem occurs in the self-test mode. Missing Color Picture does not have color. Run the monitor self-test feature check. Make sure that the video cable connecting the monitor to the computer is connected properly and is secure. Check for bent or broken pins in the video cable connector. Wrong Color Picture color is not good. Change the color-setting mode in the Color Settings to Graphics or Video, depending on the application. Try a different color preset setting in the Color Settings . Adjust the R, G, B value in the Color Settings OSD, if Color Management is turned off. Change the input color format to PC RGB or YPbPr in the Color Settings . Run the . Image Retention from a Static Image Left on the Monitor for a Long Period Faint shadow from the static image appears on the screen. Use the Power Management feature to turn off the monitor when it is not in use. Alternatively, use a dynamically changing screensaver. Use LCD Conditioning feature under Other Settings to eliminate image retention. Screen image is too small Image is centered on screen, but does not fill entire viewing area Check the Aspect Ratio setting in the . Reset the monitor to the . No Input Signal when user controls are pressed No picture, the power LED light is white Check the signal source. Ensure the computer is not in power saving mode by moving the mouse or pressing any key on the keyboard. Make sure that the video cable is connected properly with the monitor and the computer. Restart the computer. The picture does not fill the entire screen The picture cannot fill the height or width of the screen Due to different video formats (aspect ratio) of DVDs and videos, the monitor may display in screen. Run the . Troubleshooting USB Issues Specific Symptoms What User Experiences Possible Solution USB interface is not working USB peripherals are not working Check that your monitor is turned On. Reconnect the upstream cable to your computer. Reconnect the USB peripherals (downstream connector). Switch Off and then turn On the monitor again. Reboot the computer. Some USB devices like external portable HDD require higher electric current; connect the device directly to the computer. High Speed USB 3.0 interface is slow High Speed USB 3.0 peripherals working slowly or not working at all Check that your computer is USB 3.0 capable. Some computers have USB 3.0, USB 2.0 and USB 1.1 ports. Ensure that the correct USB port is used. Reconnect the upstream cable to your computer. Reconnect the USB peripherals (downstream connector). Reboot the computer. Wireless USB peripherals stop working when a USB 3.0 device is plugged in Wireless USB peripherals responding slowly or only working as the distance between itself and its receiver decreases Increase the distance between the USB 3.0 peripherals and the wireless USB receiver. Position your wireless USB receiver as close as possible to the wireless USB peripherals. Use a USB-extender cable to position the wireless USB receiver as far away as possible from the USB 3.0 port.
To learn more about how to view or download the User Guides & Manuals for your Dell product, see the Dell knowledge-base article Manuals and Documentation for your Dell Product. Frequently asked questions
Using Windows Display Settings In Windows 7, Windows 8, Windows 8.1 and Windows 10: For Windows 8 and Windows 8.1 only, select the Desktop tile to switch to classic desktop view. Right-click on the desktop and click Screen Resolution. Click the dropdown list of the Screen Resolution and select 1920 x 1080. Click OK Using Nvidia Control Panel To change the resolution using the Nvidia Control Panel: Right-click on the desktop and click Nvidia Control Panel. Click the + symbol next to Display on the left pane. Select Change Resolution under Display. In the dropdown menu on the right pane, select the resolution 1920 x 1080. Click Apply. Using AMD Catalyst Control Center To change the resolution using the AMD Catalyst Control Center: Right-click on the desktop and click AMD Catalyst Control Center. Click the + symbol next to Display on the left pane. Select Change Resolution under Display. In the dropdown menu on the right pane, select the resolution 1920 x 1080. Click Apply. NOTE: If you do not see the recommended resolution as an option, you may need to update the video card (GPU) driver by visiting the Dell Drivers & Downloads website or the video card (GPU) manufacturers website.
To reset the Dell P2419H Monitor to factory defaults, see the section of this article.
The Dell P2419H monitor has two built-in diagnostics that are available: Self-Test Feature Check - The self-test feature check on the Dell P2419H monitor allows you to check whether the monitor is functioning properly. Built-In Self Test - The Dell P2419H monitor has a built-in self test that helps you identify if the screen abnormality is with the monitor or the video card (GPU) on your computer. When you notice screen abnormalities like distortion, clarity, horizontal or vertical lines, color fade etc., it is always a good practice to isolate the monitor by running the Built-In Diagnostics. To learn how to run a diagnostic test, see the section of this Dell knowledge-base article.
The section of this Dell knowledge-base article provides information on troubleshooting common issues with the Dell P2419H monitor. The section has troubleshooting steps on how to resolve power issues, video issues, color or clarity issues, distortion issues, horizontal or vertical lines, brightness issues or pixel issues etc,.
To navigate the On-Screen Display (OSD) menu, use the buttons on the monitor. The monitor control buttons are usually on the right side , either on the side, front or bottom of the monitor. To access the On-Screen Display (OSD) menu, press Button 3 on the monitor. For more information on using the On-Screen Display (OSD) menu and different menu options, see the Operating Your Monitor section in the User Guide of your Dell P2419H monitor. . Additional Information
NOTE: Currently, offers are only available for US, Canada, UK, and France PC customers. Server and Storage not applicable. Affected Products Dell P2419H (责任编辑:) |